I have long been a fan of Sweet Pea designs having first met Allison and Annette at the Festival of Quilts in Birmingham, UK in 2015.
I’ve made a fair few of Sweet Pea in-the-hoop projects, including the first Freeform Table Runner. As you will see from the photo of the finished project, I gave it my own twist by embellishing it with ric-rac ribbon and pompom “snowballs”.
 My latest project is the Freeform Table Runner #2. For me, it is always a conundrum which fabrics to choose, the threads, the wadding (batting) to use and the size. So much choice! How do I decide what to use?
Until recently, my fabric stash was unorganised and in various boxes around my studio. I set about getting it organised and decided to sort it by colour, rather like an artist’s palette. In doing this, I discovered bundles of fabric that I had not seen for years – my guess is, I am not alone in this. Sounds familiar?
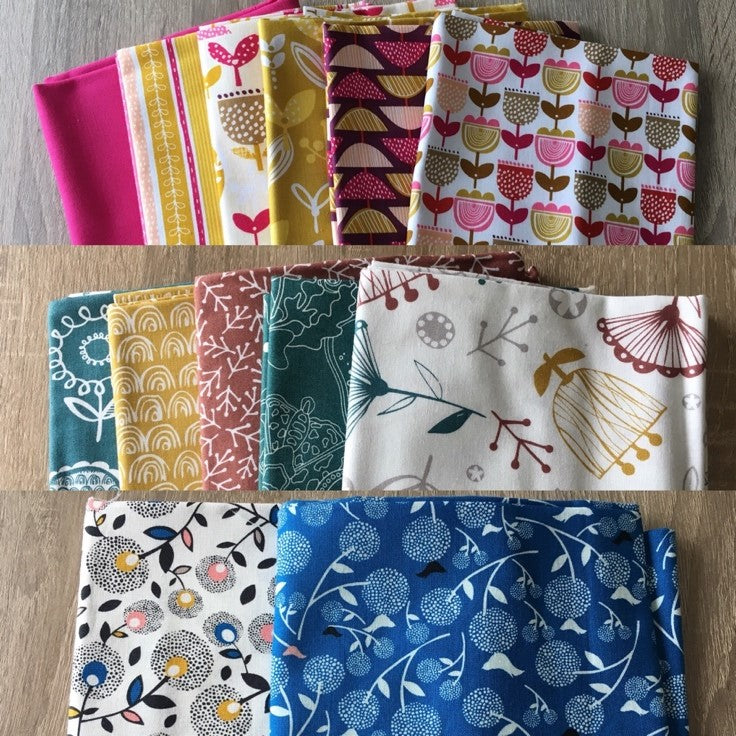
Since I often buy bundles of fat quarters from a particular designer, I decided to photograph the bundle before separating by colour, so I had a record of the fabrics that “belonged” together.
My latest project is the Freeform Table Runner #2. For me, it is always a conundrum which fabrics to choose, the threads, the wadding (batting) to use and the size. So much choice! How do I decide what to use?
Until recently, my fabric stash was unorganised and in various boxes around my studio. I set about getting it organised and decided to sort it by colour, rather like an artist’s palette. In doing this, I discovered bundles of fabric that I had not seen for years – my guess is, I am not alone in this. Sounds familiar?
Since I often buy bundles of fat quarters from a particular designer, I decided to photograph the bundle before separating by colour, so I had a record of the fabrics that “belonged” together.
 With all my fabrics now sorted by colour, it is so much easier to put together a colour scheme for a project.
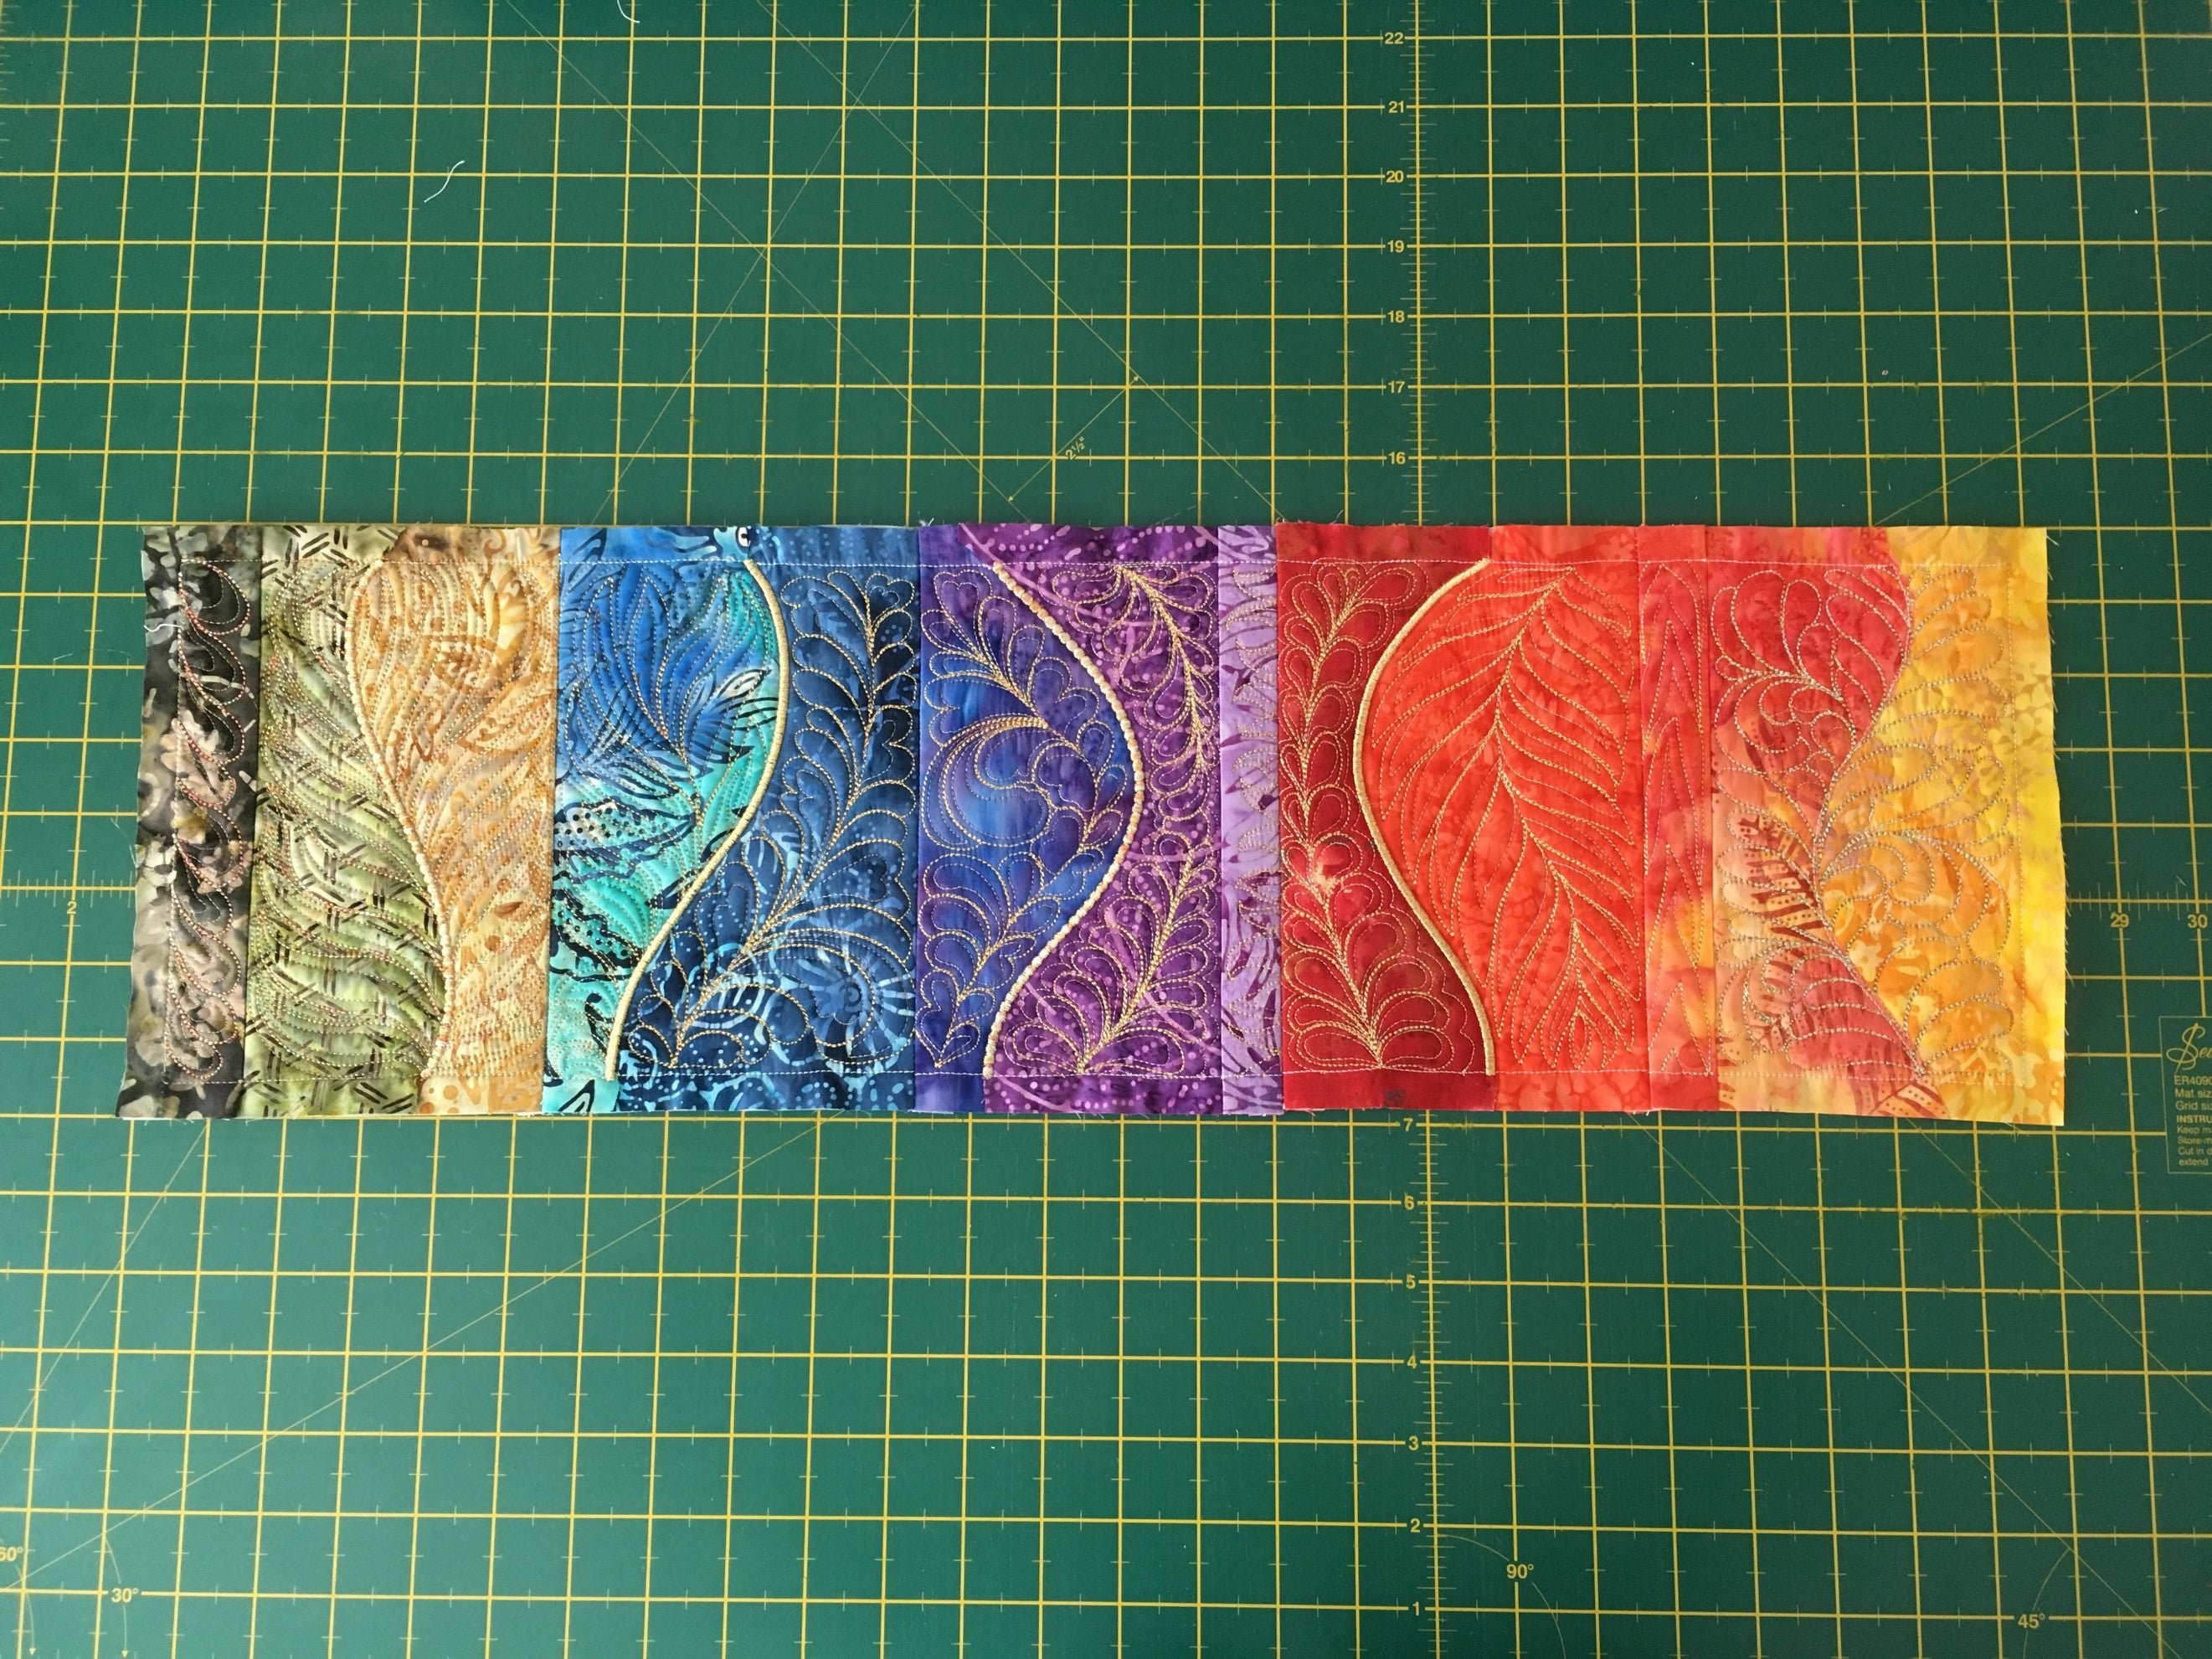
 For this project, taking inspiration from the sample featured on the Sweet Pea website, I decided to use some of my beautiful batik fabrics. The idea of a rainbow of colour appealed to me so I grabbed my box of colours and set about auditioning. The batiks I have vary in colour, pattern and scale, so it was a question of seeing which fabrics work together to provide a pleasing blend. This is what I chose:
 The next choice to make is threads. This particular design features the quilting, with lots of delicious feathers, so a contrasting colour of thread will make the designs “pop”. When auditioning threads, unwind a length of the thread from the spool and pool it on top of the fabrics you will be using for the panel. This will give you a much better idea of how it will look than if you simply hold the reel of thread against the fabric.
For my project, I wanted to use threads that matched the opulence of the fabric, so I choice to use metallic thread. I selected two: a variegated gold thread from Superior Threads and a gold metallic thread from Brother.
The next choice to make is threads. This particular design features the quilting, with lots of delicious feathers, so a contrasting colour of thread will make the designs “pop”. When auditioning threads, unwind a length of the thread from the spool and pool it on top of the fabrics you will be using for the panel. This will give you a much better idea of how it will look than if you simply hold the reel of thread against the fabric.
For my project, I wanted to use threads that matched the opulence of the fabric, so I choice to use metallic thread. I selected two: a variegated gold thread from Superior Threads and a gold metallic thread from Brother.
 I often hear from fellow sewists that they struggle with Metallic and speciality threads on their embroidery machines. So have I in the past, so here are a few tips that I hope will help you:
 This is the second panel, that features beautiful feathers. The metallic threads really pop and the variegated thread I’ve used for the “spine” has created a look of jewels or beads.
Compare this with the rather flatter appearance of the solid gold in this panel:
This is the second panel, that features beautiful feathers. The metallic threads really pop and the variegated thread I’ve used for the “spine” has created a look of jewels or beads.
Compare this with the rather flatter appearance of the solid gold in this panel:
 Of course, the choice of fabrics and threads is personal, and this is a very versatile design which works with many fabrics, threads and colour ways.
Following the instructions, I trimmed down each panel with a ½” seam allowance then joined the panels together.
Of course, the choice of fabrics and threads is personal, and this is a very versatile design which works with many fabrics, threads and colour ways.
Following the instructions, I trimmed down each panel with a ½” seam allowance then joined the panels together.

 I decided to use Kona Solids Black fabric for the borders as it makes the colours of the batik fabrics really pop.
 As ever with Sweet Pea designs, the instructions are comprehensive and easy to follow. I chose to make the table runner as-is, but you could easily adapt the design and make bags, place mats and even a quilt.
Here is my finished table runner:
As ever with Sweet Pea designs, the instructions are comprehensive and easy to follow. I chose to make the table runner as-is, but you could easily adapt the design and make bags, place mats and even a quilt.
Here is my finished table runner:


My latest project is the Freeform Table Runner #2. For me, it is always a conundrum which fabrics to choose, the threads, the wadding (batting) to use and the size. So much choice! How do I decide what to use?
Until recently, my fabric stash was unorganised and in various boxes around my studio. I set about getting it organised and decided to sort it by colour, rather like an artist’s palette. In doing this, I discovered bundles of fabric that I had not seen for years – my guess is, I am not alone in this. Sounds familiar?
Since I often buy bundles of fat quarters from a particular designer, I decided to photograph the bundle before separating by colour, so I had a record of the fabrics that “belonged” together.
With all my fabrics now sorted by colour, it is so much easier to put together a colour scheme for a project.
For this project, taking inspiration from the sample featured on the Sweet Pea website, I decided to use some of my beautiful batik fabrics. The idea of a rainbow of colour appealed to me so I grabbed my box of colours and set about auditioning. The batiks I have vary in colour, pattern and scale, so it was a question of seeing which fabrics work together to provide a pleasing blend. This is what I chose:
The next choice to make is threads. This particular design features the quilting, with lots of delicious feathers, so a contrasting colour of thread will make the designs “pop”. When auditioning threads, unwind a length of the thread from the spool and pool it on top of the fabrics you will be using for the panel. This will give you a much better idea of how it will look than if you simply hold the reel of thread against the fabric.
For my project, I wanted to use threads that matched the opulence of the fabric, so I choice to use metallic thread. I selected two: a variegated gold thread from Superior Threads and a gold metallic thread from Brother.
I often hear from fellow sewists that they struggle with Metallic and speciality threads on their embroidery machines. So have I in the past, so here are a few tips that I hope will help you:
- Buy a good quality metallic thread (I recommend Superior Threads)
- Buy a large spool of thread if possible and avoid the small 100 and 200 metre spools. Metallic threads have a memory and, when tightly wound, act like a spring. You may have seen this if you unwind a length of thread from the spool. If this is the case, try turning the spool around and unspooling from the opposite end. Threads from larger spools are much easier to handle – and are better value.
- Use the right needle. When using metallics, you need to use a needle with a large eye, such as a topstitch #90/14. I recommend Superior topstitch titanium coated needles, but you can use any good quality metallic or topstitch needle, such as Schmetz.
- Adjust the upper tension. I know from experience that many people are afraid to alter the tension of their machines. The factory setting is a general setting that will work in most cases providing you are using good quality 40-weight embroidery threads and cotton fabric. It will not work properly with all combinations of fabric type, weight and thread. Don’t be afraid to adjust the upper tension (in general with embroidery machines, avoid adjusting the bobbin tension as you should be using your machine manufacturer’s bobbin thread. If you do want to adjust the bobbin tension, I recommend purchasing a specific bobbin case – for example for Brother machines, you can buy a creative bobbin kit that contains an adjustable bobbin case.). Get to know your machine: experiment, see what happens when you change the upper tension – get to know what “good” looks like. For metallic threads, I loosen the upper tension on my Brother Innovis V3 to between 1.0 and 1.6. Do a test stitch out on your machine to find out the settings on your machine that give the results you want.

- Most embroidery machines can be slowed down. On my Brother machine, it normally stitches at up to 1050 stitches per minute. In the settings, I can set it to work at a lower speed, and for certain threads you may need to do this. Again, it is about getting to know your machine and testing.
Wadding (batting)
The Freeform Table Runner 2 features quilting, which is about creating light and shade. Having stitched out a test panel, I found that using one layer of wadding created a rather flat result for my taste. I used Hobbs 80/20 premier wadding for my panels, which does not have a high loft. To add more loft, I used two layers. If you choose to do the same (or you use a lofty wadding), you may need to raise the height of the embroidery foot to avoid it getting caught in either the wadding or the fabric. On my Brother machine, I can adjust the height of the embroidery foot in the machine’s settings. If you do not know how to do this on your machine, you will find the information in your machine’s user guide.Stabiliser
In the instructions for the table runner, it recommends using cut-away stabiliser. This is generally a good choice as it provides good support for the large amount of stitches in the designs. If you do not have cut-away in your stash, you can use tear-away as an alternative. You may need to use two layers to provide the stability the project needs. I have also used soluble stabiliser; a woven type, such as Solufleece or a heavy-duty film type, such as Ultra Solvy has worked well for me.The Stitch Out
I still find machine embroidery fascinating to watch, even though I have stitched out many projects. While it may be tempting to walk away from your machine when it is in operation, my own experience is that if there is going to be a thread break or some other problem, it will happen when I am not there! Make sure you follow the instructions – at least the first time you make the project – that way, you will have a great chance of success. I can’t tell you the number of times I’ve put the fabric the wrong way up and had to unpick. I’ve learned the lesson.
This is the second panel, that features beautiful feathers. The metallic threads really pop and the variegated thread I’ve used for the “spine” has created a look of jewels or beads.
Compare this with the rather flatter appearance of the solid gold in this panel:
Of course, the choice of fabrics and threads is personal, and this is a very versatile design which works with many fabrics, threads and colour ways.
Following the instructions, I trimmed down each panel with a ½” seam allowance then joined the panels together.
I decided to use Kona Solids Black fabric for the borders as it makes the colours of the batik fabrics really pop.
As ever with Sweet Pea designs, the instructions are comprehensive and easy to follow. I chose to make the table runner as-is, but you could easily adapt the design and make bags, place mats and even a quilt.
Here is my finished table runner:

Leave a comment
All comments are moderated before being published.
This site is protected by hCaptcha and the hCaptcha Privacy Policy and Terms of Service apply.