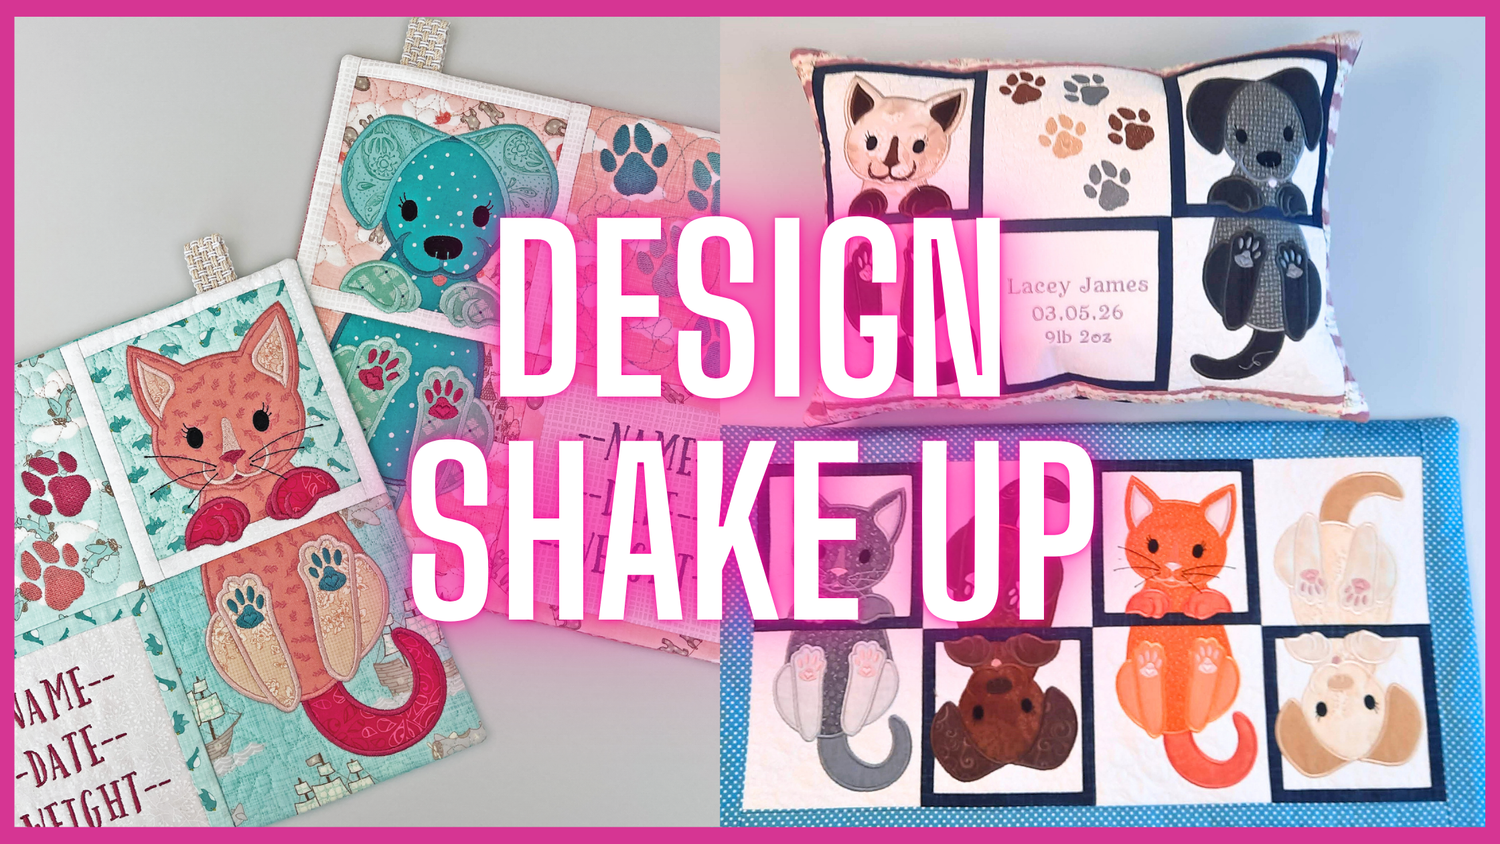
Hangers make beautiful artwork on your walls, but you only have so much wall space! Luckily, an ITH hanger design doesn't just have to be a hanger... in fact, you can easily turn it into something like a cushion, and this is just what we did with the Puppy and Kitten Birth Announcement Hanger in a recent live! Watch the video to see the first part of the process it in real time, then follow the simple steps below to transform your hanger in this blog.
Here's how to turn the Puppy and Kitten Hanger into a cushion:
After making your puppy and kitten panels, you will need to trim all sides back to ½”.
Lay out your blocks in order, with the long side of the panels together. Place the first two blocks right sides together.
Pin and stitch the side seam on your sewing machine. Stitch just inside the border already stitched on the blocks so the stitching will not be seen on the right side later. Continue this until you have joined the remaining blocks in that row together.
Open the seams and iron them flat. If needed, trim the edges to make them even.
Borders
Borders are next. We made ours 8cm (3”) wide and measured the length of the joined panels to get the length of each side.
Cut two strips of border fabric the length you just measured. Then cut two pieces of batting to match.
Secure the batting to the border fabric in one of these two methods:
- The first option is to place the border fabric right side up on top of the batting, and with a long basting stitch, sew ¼” from the edge. Basting the long edges together will prevent them from moving. You may want to use a bobbin thread that will stand out for this step.
- The second option is to lightly spray temporary adhesive to the batting and then lay your fabric right side up on the batting. (We chose to use the spray baste method.)
Place the cushion on top of the border fabric (with the attached batting), right sides together. Pin together.
Stitch together with a ½” (1.25cm) seam. Repeat for the opposite border. If you used basting stitches on your borders, remove them now. Trim back the batting from the seam allowance. Fold over and iron the side border down neatly.
Repeat for the opposite border. If needed, trim the borders to make them even.
Now measure one of the side edges without a border (including the new border width in your measurement). Use the same steps above to cut, add batting, and stitch down.
Envelope Backing
Now you need to add your backing! Take your pieces backing fabric and make sure the width is 5” – 6” wider than half the width of the cushion panel.
Fold one of the long edges of your backing over ½ inch, wrong sides together. Press. Then fold over a second time another ½ inch. Press. Stitch along the folded edge to hold it in place. Make sure the thread and bobbin match the fabric colour.
Do the same with your second backing piece.
Overlap the two pieces of backing by 4” – 5” (10 - 13cm) and pin the overlap into position. Make sure the right sides are together.
With the overlapped backing, right side up, lay the cushion panel face down onto the backing. Pin into position securing the edges and the overlap before stitching.
Stitch the two layers together using a ½” seam around the outside perimeter of the cushion. Trim the backing back to the panel seam (leaving the 12.5mm/ ½” seam allowance).
Check for any puckers on the underside of the work. Remove the pins that were securing the backing overlap.
Lining
To achieve a clean finish from the front, we like to line the panels with another fabric. In this case, we used calico, measuring the joined panels and borders to get our fabric size.
We need to leave a 5” - 6” opening at one end of the cushion lining to turn through the work. Mark this opening before stitching around the perimeter. Stitch the two layers together, leaving an opening for turning through.
Trim back the seam to 6mm (¼”), including any overhanging lining. Leave ½” (12.5mm) at the opening. Trim off the corner points if needed.
Final Steps
Turn out through the gap left in the lining and use a chopstick to help push out the corners. Pin the opening closed and either fabric glue or box stitch the opening closed.
Turn the cushion out through the overlap opening. Push the corners out with a chopstick if necessary. Press well.
Your cushion cover is now finished!

Add a cushion insert or stuff with stuffing for use.
If you turn this hanger or any design into a cushion, please share with us on any of our social profiles (bottom left) - we'd love to see it!

3 comments
Erin
Lorie – the video shows it much better, I would recommend using these instructions alongside the video if possible! I have included Part 2 in this blog as this covers the main points mentioned.
Barb – the design comes in 4×4, 5×5, 6×6, and 7×7 – you could definitely use it in a quilt! If you click the product listed at the bottom, you will see an example where a customer did this (scroll down to Community Photos).
Lorie Ward
Does the lining piece go wrong side up on the front of the cushion? I wonder if we should make this a bit clearer? I didn’t catch the video, but love this blog! It’s great! Thank you for doing this!
Barb Klempay
those are so cute. Would it be possible to incorporate them into a quilt top? What is the hoop sizes? Thank you, Barb
Leave a comment
All comments are moderated before being published.
This site is protected by hCaptcha and the hCaptcha Privacy Policy and Terms of Service apply.