Sweet Pea Machine Embroidery Designs Cutting Files Disclaimer. The .svg and .fcm cutting files that Sweet Pea Machine Embroidery Designs provides with designs are free. As they are free we have not edited them to suit all applications.
If you wish to use these files to cut out fabric, you will need to increase the cutting lines as they are provided with the same dimensions as the tack down stitch. This means if used as is they may not get caught properly in the tack down stitch. For applique pieces, increasing the lines by 2mm should be sufficient. In some instances, the background fabric cutting line is also included with the cutting and will also need to increase the size to allow for any seam allowance. Refer to the design's fabric requirements for the dimensions.
All good cutting machines come with free software in which you can make the changes as per your own requirements. For more comprehensive instructions on how to use the cutting files in machine embroidery please read below, as we have taken some steps from another SVG blog
Step 1 – .fcm files and Placement Lines Placement lines in an embroidery design are the key to cutting appliqué pieces. Older designs from Sweet Pea included the entire design in the .fcm file so I take those into the Brother Canvas free online app to isolate the placement line. (Embroidery software can also do this.) The newer .fcm files include only placement lines so those can be loaded directly into your ScanNCut – with one exception. For the older files, login to Canvas, click on New. Click on the SVG icon. On the next screen select your .fcm file, and click upload. ![]() Start clicking on the layers to drag the design apart. Delete everything other than the placement lines. If needed, reference the Sweet Pea instructions to identify the placement lines. For the Mitten Table Runner there are two: the mittens and the cuffs. There are 3 lines associated with each – the placement line, the stitch down line, and the satin or raw edge stitching. The placement line will be the bottom one.
Start clicking on the layers to drag the design apart. Delete everything other than the placement lines. If needed, reference the Sweet Pea instructions to identify the placement lines. For the Mitten Table Runner there are two: the mittens and the cuffs. There are 3 lines associated with each – the placement line, the stitch down line, and the satin or raw edge stitching. The placement line will be the bottom one.  When only the placement lines remain, they may need to be ungrouped. To ungroup, click on each set of objects, click on edit, and then click on ungroup.
  Download the file to your computer. Click on Download. Transfer to your computer/USB stick or transfer it wirelessly.
  Even though newer files can be loaded directly into the ScanNCut, you may need to take them into Canvas to separate or ungroup the placement lines. For example, the .fcm file for the Let It Snow Table Runner has several placement lines that are touching each other. The ScanNCut sees it as a single object. So I quickly take the file into Canvas to separate.
 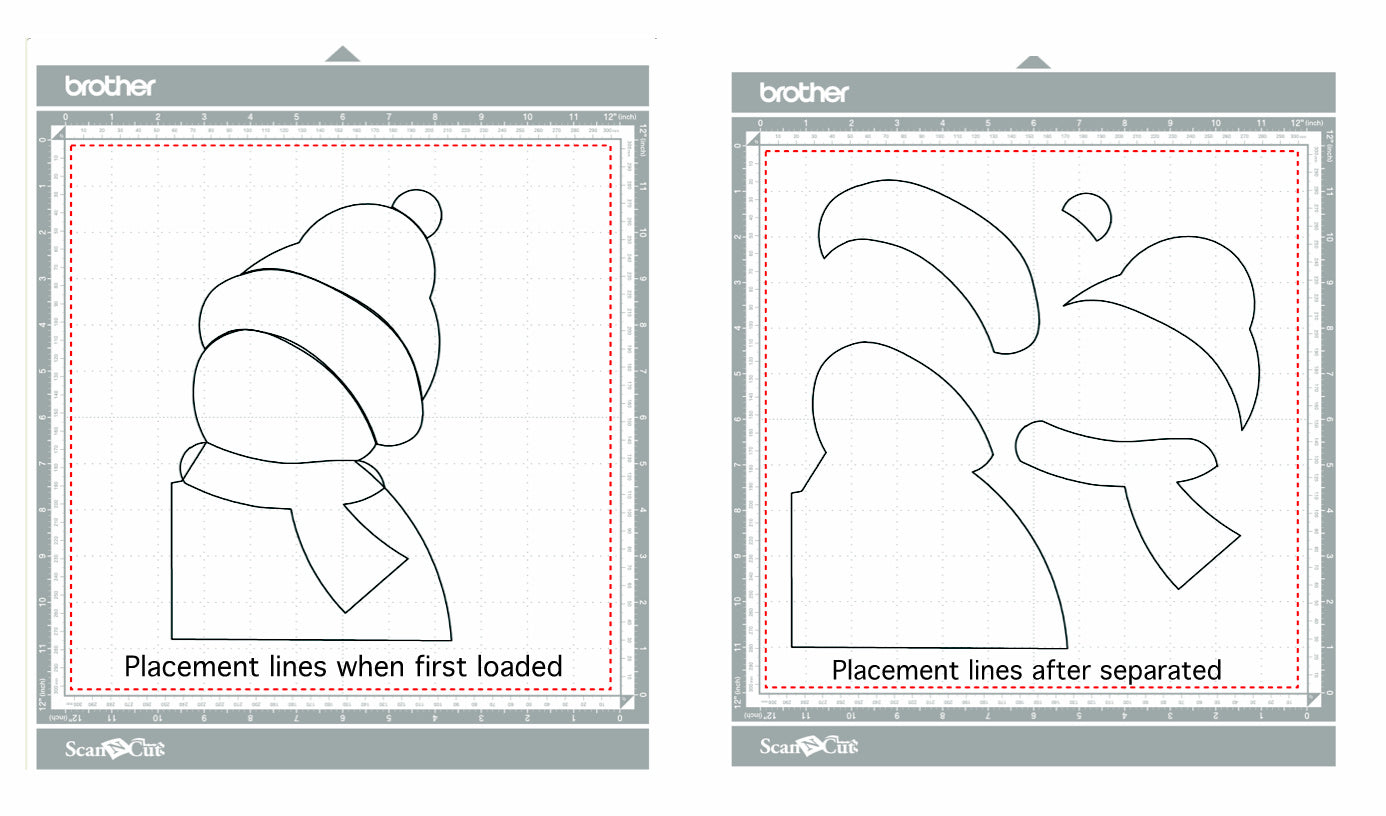 Step 2 – Prepare Your Fabric Step 3 – Cutting the Appliqué Shapes Load the file with your placement lines into your ScanNCut. You need to increase the size of the appliqué shape so that it is slightly larger than the placement line to ensure that it stays in place when you do the stitching line to secure it. In many cases a 2mm increase in size will do the trick. You can change the unit of measure to mm in tools (you can also do this in inches but adding 2 to something is easier for me than adding a fraction). Select an object and go to the editing screen. Make sure the Aspect Ratio icon is unchecked. Add 2 to the height – this will auto change the width. Do this to each element that you’re going to cut.
  Adjust your cutting blade depth. I start at 5 and tweak as needed using the Test option (my pressure is 5 and speed is 1). Use the Background Scanning Function to scan the mat with your fabric on it. I scanned both a mitten and a cuff sandwich on the same mat. Because objects are ungrouped, I can move each individually for a good fit on my fabric. Add the test cut. If the test cut is good then finish cutting. If not adjust the blade depth until it cuts cleanly. Then finish cutting the appliqué.
  Your appliqué is ready for embroidering.
Leave a comment
All comments are moderated before being published.
This site is protected by hCaptcha and the hCaptcha Privacy Policy and Terms of Service apply.