
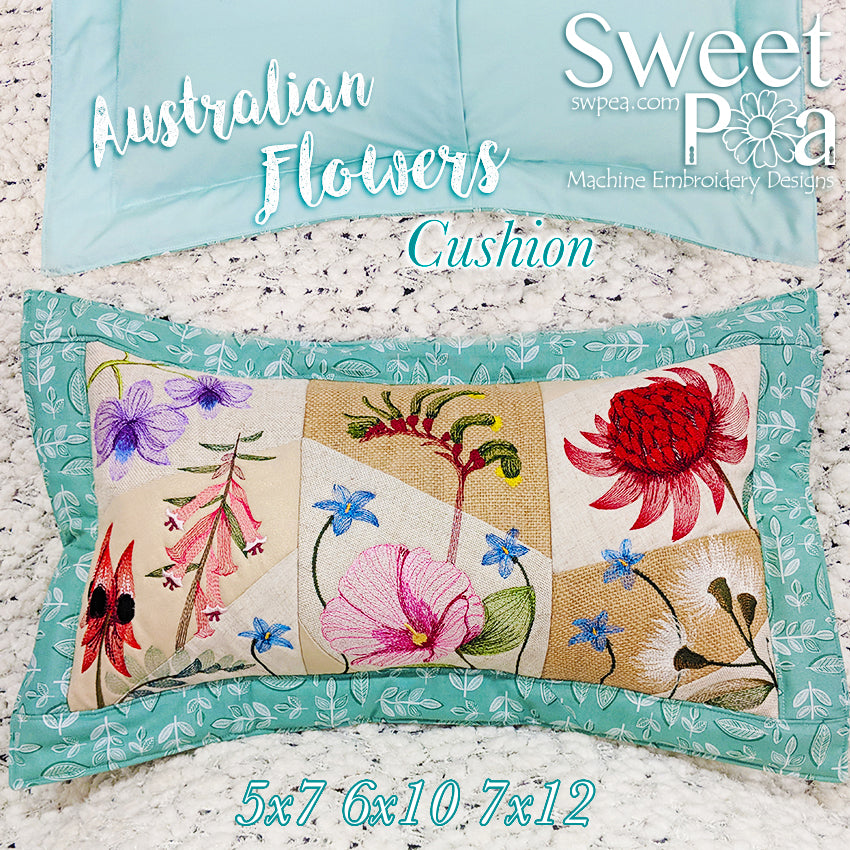
When I first saw the Australian Flowers cushion I was immediately struck by the embroidery. Even though I am not familiar with the flowers themselves (I have visited Australia but have no recollection of having seen these blooms), what I like about the designs is the modern-looking embroidery techniques used – a more open texture than some of the more “traditional” flower embroidery digitised designs more often seen elsewhere.
What I particularly liked with the Sweet Pea sample was the use of hessian/burlap. A while ago, I purchased some hessian and I have never got around to using it. My guess is I am not alone! This project was the perfect opportunity for me to give it a try.
 I made the decision to follow the colours used by the Sweet Pea team (they are Australian after all) as I assumed they know the colours of their native flowers. For the most part, I tend to use either Brother or Isacord threads for my embroidery as they work well in the Brother Luminaire XP1 machine and I was able to find suitable colours in my collection. I assembled the fabrics and threads I needed for the three panels from my stash and cut the fabric according to the instructions provided.
Taking advantage of the largest frame (16” x 10 5/8”) on my machine, I chose to make the large size panels (7” x 12”). This made a good-sized finished cushion (25” x 15”), perfect for my armchair.
Although the instructions suggest using a cut-away stabiliser, I generally use a medium weight tear-away as I like to remove as much stabiliser as I can at the end, so I am left with a soft cushion. You could use a wash-away mesh or film stabiliser to be able to remove all of the stabiliser if you wish.
As you can see from the photographs that follow, it is important to follow the advice in the instructions when placing the background fabrics, to ensure that when they are folded back to the right side, they cover the area needed (rather like Foundation Paper Piecing). It’s worthwhile “auditioning” the placement to be sure (see the first photograph below), otherwise you may be needing that seam ripper (ask me how I know)!
Having finished placing and stitching down the background fabrics (I really like the jaunty angles used), I followed the colours shown in the embroidery file. As you can see from the photograph of my machine’s screen, this first panel has 35 colour changes and takes approximately 52 minutes to stich out on my machine. The three panels do take some time to stitch out, but the results are worth it.
As you can see from the photographs of the first panel, the embroidery is beautiful, and it stitches out wonderfully. I particularly like the flower at the top in purple.
The other panels stitched out equally as well. I did change the needle from my usual embroidery size 75 to a larger size (I used a size 90) for the panels where I used hessian/burlap as it is quite a rough fabric. I particularly like how the texture of the hessian shows through the embroidery.
Once the panels have been stitched out, they need to be trimmed before stitching together; I decided to put my favourite panel in the middle.
 To reduce some of the bulk in the seams, I trimmed back the wadding/batting. Be sure to press the seams open to reduce bulk.
Once the embroidered panels have been joined together, it is straightforward to put together the cushion cover as well as the internal cushion pad.
And here is the final result, a lovely Australian Flower cushion (made in England!).
 from the website -
I made the decision to follow the colours used by the Sweet Pea team (they are Australian after all) as I assumed they know the colours of their native flowers. For the most part, I tend to use either Brother or Isacord threads for my embroidery as they work well in the Brother Luminaire XP1 machine and I was able to find suitable colours in my collection. I assembled the fabrics and threads I needed for the three panels from my stash and cut the fabric according to the instructions provided.
To reduce some of the bulk in the seams, I trimmed back the wadding/batting. Be sure to press the seams open to reduce bulk.
from the website -
Leave a comment
All comments are moderated before being published.
This site is protected by hCaptcha and the hCaptcha Privacy Policy and Terms of Service apply.