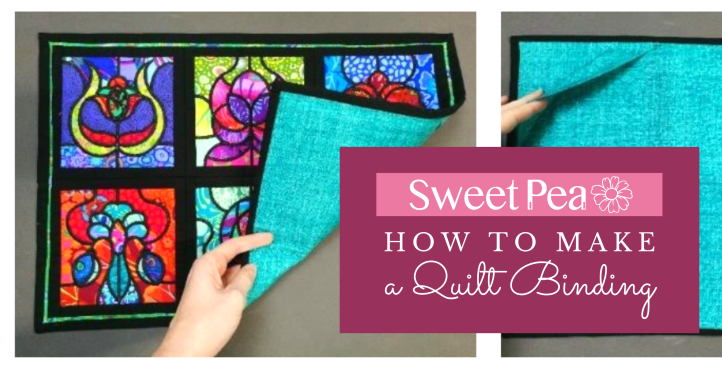
What is Quilt Binding?
Quilt binding is the finishing touch to a quilt.
It is the fabric used cover the outer edges of a quilt and keeps the edges intact and adds a wonderful finish to the quilt's design. Sewing binding around a quilt's edges is one of the final steps in quilt making.
Quilt binding can be constructed from a fabric that's already been used in the design, or with any other fabric that works with the layout. Binding can be made from a single layer of fabric, but two layers (called double-fold binding) are much more durable.

To make the binding, measure the length and width of the runner/ hanger and add them together and then multiply by two and add an extra 10” for corners.
Cut strips of fabric to make up this length (ideally the fabric should be cut across the piece: selvage to selvage for the best binding finish.
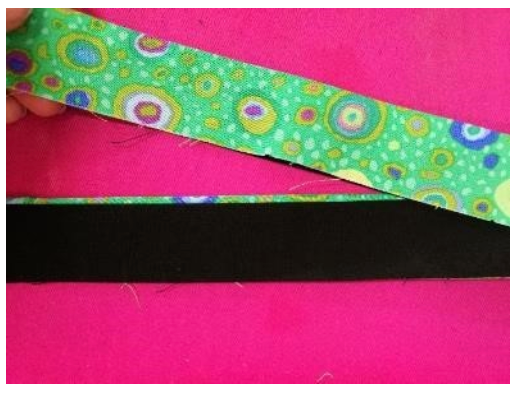
For a peeper binding you will require 2 different fabrics, one that will “peep” out from the binding to add contrast and one for the binding itself. We’ve cut the peeper at 1 ¾” wide and the outer binding colour at 1 ½” wide.

The cutting widths are totally variable to what you desire but there does need to be a ¼” difference between the 2 strips. The finished width we have used will provide a generous ½” binding on the edge.
JOINING STRIPS - Lay your fabric strips right sides together as shown. Sew a diagonal seam from corner to corner (45 degree angle), trim the corner, and repeat until all the binding strips are sewn together into one long strip.
Press your joined fabric as you go to ensure this remains flat for your binding and eliminates bulk.

Repeat the steps above for the other strip of fabric.

To make up the peeper binding strip, lay right sides together and stitch exactly ¼” from the edge trying to keep this stitching as straight and even as possible.

With an iron (working on the right side of the fabric as it’s much easier) press the closed seam allowance to the side from the peeper fabric. Press the whole length.

With wrong sides together fold widthways and press the peeper edge keeping the raw edges as even as possible.

Pressed binding should look like this.
The peeper binding is stitched onto the underside of the runner/ hanger and then folded around to the topside and stitched into position. To ensure perfect corners we suggest you mark the ¼” seam intersections on the 4 corners of the runner/ hanger.
Create a 45 degree angle at the beginning of your binding by flipping the end across to the side of the binding, as in the photo below. This will give a smooth finish when finally joining the 2 ends together. Our peeper side of the binding is facing up.
OPTION: this can also be done with the binding folded instead of being opened out.
Then press the whole long strip in half, wrong sides together and iron down.

Match the raw edges of the hanger and the peeper binding to the desired starting location (With your quilt wrong side up, start about halfway along one side).
A - Using a ruler, mark 1 inch down from the end of the strip. Mark with a pin.
B - Then using a ruler, mark 2 inches down from the 1-inch mark. Mark with a pin.

Using a ¼ inch seam, stitch 1 inch of the open fold onto the runner/ hanger and stop stitching when you get to the 1-inch mark.

Then leave a 2 inch gap (this will provide an opening for the end of the binding fabric at the end) and then start stitching again at the 2 inch mark.

Continue sewing until you reach the first corner and stop stitching 0.65cm (1/4”) from the end but keep your needle down. Lift your foot and turn your runner/ hanger (with your needle still down). Continue stitching to the corner.
DIAGRAM BELOW


Lift the binding strip over pulling against that angled stitch that we just made, forming a diagonal fold. Then pull the binding strip back down creating a fold at the top. Pin and start stitching again until you reach the side of the runner/ hanger that you started on, mitring the corners as you go.

Stop stitching when you get 2 inches from the starting point.

To work out how much excess fabric we need to leave, measure from the finishing point and the start of the second stitch line (it should be about 5 inches). You can use a pin or pen to mark the location. Then cut your excess fabric. You should have about 5 inches of fabric left to tuck into the little pocket of the binding.

Before we tuck the end of the strip into the pocket, we need to trim a little bit of fabric off the raw edge. This will just help the strip to sit flatter in the pocket.

Place the end of the binding fabric into the pocket created at the start of the binding process. Pin in place.

Continue to stitch the seam until binding is completely sewn on.

Now we need to iron the binding. Fold the binding over the border towards the front and iron the seam flat.
Now turn the runner/ hanger over so you are working on the front.
We started at the corners of the quilt. Fold in one side of the corner JUST past the stitching and iron well. Pin in place. This will help with getting the nice pointed corner. Repeat for the other side of the corner meeting up with the first fold creating a nice pointed corner. Repeat for all four corners of the runner/ hanger.

Then continue folding and pinning the remaining binding to the front of the runner/ hanger, JUST past the stitching. Once folded, iron well.

Start stitching anywhere on the front of the runner/ hanger, between the peeper and outer layer of the binding. When you get to the corner, simply just leave your needle down and lift the foot and rotate the runner/ hanger. Put your foot down and continue stitching in this fashion until you are right around the runner/ hanger.

Iron the binding and enjoy!

These pictures are from our Stained Glass Blocks design:

Leave a comment
All comments are moderated before being published.
This site is protected by hCaptcha and the hCaptcha Privacy Policy and Terms of Service apply.