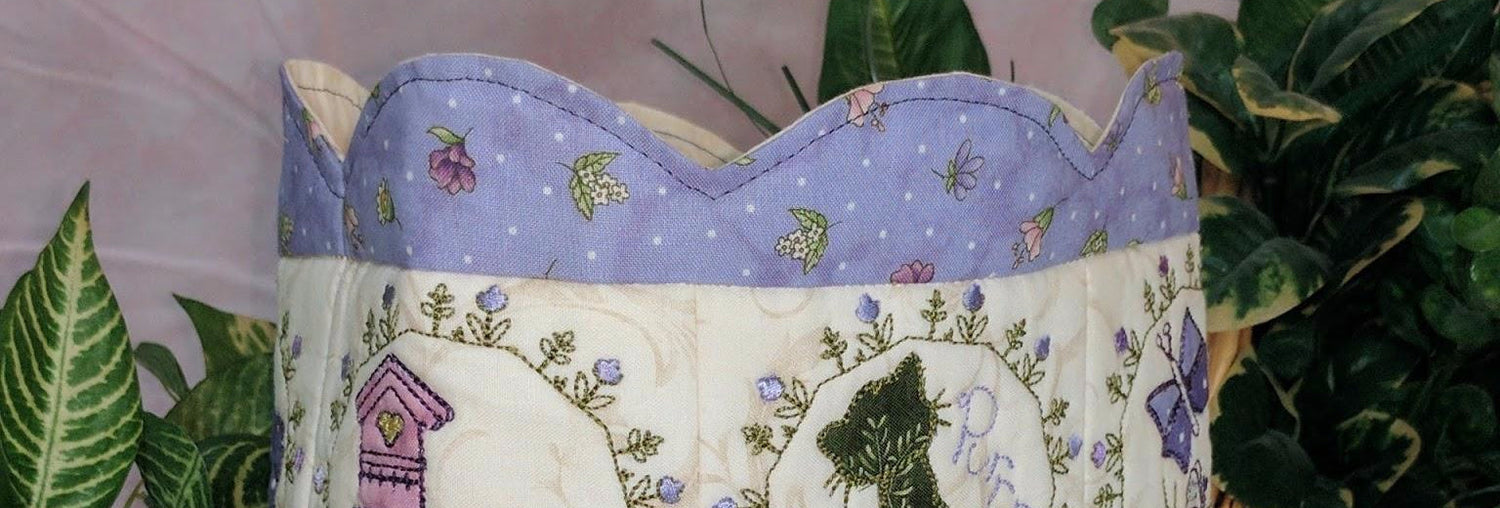
Scallop Edge Instructions
© by Sandy Kiester USA - April 2017
Photos provided by Mia Swafford
 Items used in preparing to mark and stitch a scallop edge. Spray adhesive, pencil or pen, scissors, rotary cutter and cutting mat if you have one, ruler, iron, fabric glue, round plate or cup and fuse-n-tear or similar.
 Joining the blocks
It is easier to work with one panel when marking and stitching for a scalloped edge. As instructed in the New-Life Easter Basket lay out the panels as you would like them. Join the 6 applique blocks together as well as the 6 bottom panels. Join those 2 rows together. Add the top border WITHOUT the batting, that will be added after the scallops are stitched. Press all seams so you have a nice flat panel to work with.
Cutting the lining
Place the lining under the top panel.
Joining the blocks
It is easier to work with one panel when marking and stitching for a scalloped edge. As instructed in the New-Life Easter Basket lay out the panels as you would like them. Join the 6 applique blocks together as well as the 6 bottom panels. Join those 2 rows together. Add the top border WITHOUT the batting, that will be added after the scallops are stitched. Press all seams so you have a nice flat panel to work with.
Cutting the lining
Place the lining under the top panel.
 Trim excess material from all sides making each corner square.
 Each edge of the square should have equal sides. Set aside the lining it will be added at a later step. Turn front panel wrong side up.
 Marking the bottom corners
I mark my stitch lines with dashes first. I don’t cut away the excess corner material nor center, it is done at a later step. Notice the dash lines in the center of the panel. Since the seam allowance has been stitched in this area the marking will be 1” shorter in width.
Marking the bottom corners
I mark my stitch lines with dashes first. I don’t cut away the excess corner material nor center, it is done at a later step. Notice the dash lines in the center of the panel. Since the seam allowance has been stitched in this area the marking will be 1” shorter in width.  Dash lines are marked with Sharpie Pen for better viewing. Use a pencil for your project.
 Marking the Scallops
Tear off a section of Pellon's 'fuse-n-tear' long enough to cover the length of the border and trim to 5” wide. I keep my roll of this product in this custom made box from Reynolds Aluminum.
Marking the Scallops
Tear off a section of Pellon's 'fuse-n-tear' long enough to cover the length of the border and trim to 5” wide. I keep my roll of this product in this custom made box from Reynolds Aluminum.
 Press the fuse-n-tear to the top area of the panel. Having the straight edge line up with the top raw edge.
 With pencil, mark on top of border seam allowance, then mark ¾” above that.
 You should have two horizontal lines marked on your paper like this…
 Marking the vertical lines are done next. Line the edge of the rule over the basting line on the right side of the panel.
 Move the ruler over the seam allowance of the next block. Mark a vertical another line with pencil.
Continue with each block and the ending baste line on the left of the panel.
Move the ruler over the seam allowance of the next block. Mark a vertical another line with pencil.
Continue with each block and the ending baste line on the left of the panel.
 Place the curve of a bowl between the vertical lines, matching at the penciled intersections. Draw with pencil along the bowl's edge. Continue to the end of the panel, include the seam allowance. You will be stitching on these scalloped markings.
( I re marked the curved lines with a Sharpie pen so they would show up better. )
Place the curve of a bowl between the vertical lines, matching at the penciled intersections. Draw with pencil along the bowl's edge. Continue to the end of the panel, include the seam allowance. You will be stitching on these scalloped markings.
( I re marked the curved lines with a Sharpie pen so they would show up better. )
 Trim the excess paper on each side of the panel.
 Remove the paper, set aside the top panel.
 Adding the marked scallop paper
Place the paper pattern on the wrong side of the lining. Aline the top of the paper pattern along the top raw edge of the lining and sides. Press in place.
Adding the marked scallop paper
Place the paper pattern on the wrong side of the lining. Aline the top of the paper pattern along the top raw edge of the lining and sides. Press in place.
 With RIGHT sides together place lining on top of panel. The bottom of each scallop should match the seam allowance of each block.
 Lining should match the raw edges of the top panel. Pin or clip in place.
 Stitching the scallops
Take your project to the sewing machine. I like to use a tiny stitch and a open-toe presser foot. Start stitching on the top of the first scallop, leaving a 3 inch gap from the edge. You are stitching on the pencil mark.
Stitching the scallops
Take your project to the sewing machine. I like to use a tiny stitch and a open-toe presser foot. Start stitching on the top of the first scallop, leaving a 3 inch gap from the edge. You are stitching on the pencil mark.
 Sew slow following the pencil mark.
 Detail of scallop turn. It’s a “U” turn not a point. Pivot your machine with the needle in the down position.
 Continue stitching scallops, stop at the top of the last scallop, 3” from the raw edge.
 Fold the lining back this 3” and clip in place. Repeat on other end.
 Place a few drops of Fray Check at the bottom of each scallop. Let dry while proceeding to enclose the panel. Don't disturb these cuts...let that Fray check dry. No Fray Check? Apply fabric glue to both the panel and the lining, let dry THEN cut this area.
 Fold top panel over, matching the raw edges.
 Closing the panel
Time to stitch together the open end together to create the bag, we are making a tube, the bag itself per se. First the outside seam is stitched. Then the linings side seam. With right sides together match the blocks seam allowances and the top and bottom raw edges. Clip or pin in place.
Closing the panel
Time to stitch together the open end together to create the bag, we are making a tube, the bag itself per se. First the outside seam is stitched. Then the linings side seam. With right sides together match the blocks seam allowances and the top and bottom raw edges. Clip or pin in place.
 Stitch a ½” seam allowance.
 Press seam allowance open.
 Turn the enclose panel inside out. Don’t push out scallops yet, the lining must be stitched closed first.
 Pull lining over back over the panel, right sides of lining and panel should face each other.
 Fold panel back upon itself so it is out of the way.
 Matching raw edges of the lining, Clip or pin in place.
 Pull back paper on each side of lining clip it out of the way. Stitch a ½” seam allowance.
 Press paper back on lining.
 The seam on the lining and panel should match. Press open linings seam allowance.
 Clip or pin panel and lining together, to finish stitching the last 6” of the scallops. You may need to remove your sewing machines table and insert, leaving the machine with it’s open-arm feature.
 Place the lined panel on the open arm and sew the last scallop closed. You can pencil mark over the opened seam to guide you to the scallop point.
 Starting at the seam carefully remove the paper, top section first.
 You can use a seam ripper to start tearing the paper under the seam. Set paper aside, you will use the pattern again on the batting filler in a later step.
 Fray Check the fabric on this seam and above the lining and panels stitching.
 Trim away excess fabric from scallops, leave ¼” from stitch line.
 Notch the seam allowance every ⅜” to rid the seam of excess fabric, giving you a smoother top turned edge.
 For your scallops to lay flat with no puckers on the bottom portion, you must release the tension in that area. On your cutting mat use an Exacto knife to get to that tight space. Using scissors can cause you to snip the thread line. Using an Exacto knife release the point tension with 2 miter cuts.
 Turning the scallops
Pull the lining out exposing its right side.
Turning the scallops
Pull the lining out exposing its right side.
 Push the lining back into the bag.
 Smooth the lining on the inside of the bag. Pull on it to match the raw edges of the bottom to the panels raw edge on the bottom.
 While using the bone to push out the curve of the scallops roll the seam allowance with your fingers to help straighten and smooth until flat. Press with iron on the edge only.
 I will now turn it back outside in.
 Press scalloped pattern onto batting. Cut along scallop line. Add shaped batting to the border of the panel using spray adhesive to attach.
 Turn bag inside out, adjust batting with fingers.
 Baste batting down through all layers of the bag.
  Turn the bag inside out to finish the bottom seams.
 After turning the lining half way up the bag to get it out of the way, mark the bottom boxing cutouts on both the panel and lining as shown.
 Cut out the same amount on other side of the bag.

 Turn inside out, pull the lining down and cut away the excess corner fabric.
 Turn the bag over and repeat on the other side.
 Turn outside in to stitch the bottom seam and corners of the front panel -the outside of bag. Match bottom block seams. Clip or pin in place.
 Sew bottom seam ½” from edge.
 Fold corners, matching seam allowances. Stitch with ½” seam allowance.
 With right sides together of lining, match raw edges, clip or pin in place.
 Next stitch the linings bottom seam, leaving an 6” opening for turning.
 Fold the corners….
 Stitch the corners...
 Turn inside out through the opening and adjust any batting if necessary.
 Smooth out panel. Stitched close the linings bottom seam by hand or machine.
  Push and smooth the lining into the bag.
 Press border of bag, top-stitch if you like. Stitch in the ditch at applique block seams.
 Stitch in the ditch on bottom panels.
 Fold and press the corners and bottom boxing to give the finished bag soft edges.


 https://swpea.com/products/new-life-easter-basket-4x4-5x5-6x6-in-the-hoop-machine-embroidery-design
Items used in preparing to mark and stitch a scallop edge. Spray adhesive, pencil or pen, scissors, rotary cutter and cutting mat if you have one, ruler, iron, fabric glue, round plate or cup and fuse-n-tear or similar.
Joining the blocks
It is easier to work with one panel when marking and stitching for a scalloped edge. As instructed in the New-Life Easter Basket lay out the panels as you would like them. Join the 6 applique blocks together as well as the 6 bottom panels. Join those 2 rows together. Add the top border WITHOUT the batting, that will be added after the scallops are stitched. Press all seams so you have a nice flat panel to work with.
Cutting the lining
Place the lining under the top panel.
Trim excess material from all sides making each corner square.
Each edge of the square should have equal sides. Set aside the lining it will be added at a later step. Turn front panel wrong side up.
Marking the bottom corners
I mark my stitch lines with dashes first. I don’t cut away the excess corner material nor center, it is done at a later step. Notice the dash lines in the center of the panel. Since the seam allowance has been stitched in this area the marking will be 1” shorter in width.
Dash lines are marked with Sharpie Pen for better viewing. Use a pencil for your project.
Marking the Scallops
Tear off a section of Pellon's 'fuse-n-tear' long enough to cover the length of the border and trim to 5” wide. I keep my roll of this product in this custom made box from Reynolds Aluminum.
Press the fuse-n-tear to the top area of the panel. Having the straight edge line up with the top raw edge.
With pencil, mark on top of border seam allowance, then mark ¾” above that.
You should have two horizontal lines marked on your paper like this…
Marking the vertical lines are done next. Line the edge of the rule over the basting line on the right side of the panel.
Move the ruler over the seam allowance of the next block. Mark a vertical another line with pencil.
Continue with each block and the ending baste line on the left of the panel.
Place the curve of a bowl between the vertical lines, matching at the penciled intersections. Draw with pencil along the bowl's edge. Continue to the end of the panel, include the seam allowance. You will be stitching on these scalloped markings.
( I re marked the curved lines with a Sharpie pen so they would show up better. )
Trim the excess paper on each side of the panel.
Remove the paper, set aside the top panel.
Adding the marked scallop paper
Place the paper pattern on the wrong side of the lining. Aline the top of the paper pattern along the top raw edge of the lining and sides. Press in place.
With RIGHT sides together place lining on top of panel. The bottom of each scallop should match the seam allowance of each block.
Lining should match the raw edges of the top panel. Pin or clip in place.
Stitching the scallops
Take your project to the sewing machine. I like to use a tiny stitch and a open-toe presser foot. Start stitching on the top of the first scallop, leaving a 3 inch gap from the edge. You are stitching on the pencil mark.
Sew slow following the pencil mark.
Detail of scallop turn. It’s a “U” turn not a point. Pivot your machine with the needle in the down position.
Continue stitching scallops, stop at the top of the last scallop, 3” from the raw edge.
Fold the lining back this 3” and clip in place. Repeat on other end.
Place a few drops of Fray Check at the bottom of each scallop. Let dry while proceeding to enclose the panel. Don't disturb these cuts...let that Fray check dry. No Fray Check? Apply fabric glue to both the panel and the lining, let dry THEN cut this area.
Fold top panel over, matching the raw edges.
Closing the panel
Time to stitch together the open end together to create the bag, we are making a tube, the bag itself per se. First the outside seam is stitched. Then the linings side seam. With right sides together match the blocks seam allowances and the top and bottom raw edges. Clip or pin in place.
Stitch a ½” seam allowance.
Press seam allowance open.
Turn the enclose panel inside out. Don’t push out scallops yet, the lining must be stitched closed first.
Pull lining over back over the panel, right sides of lining and panel should face each other.
Fold panel back upon itself so it is out of the way.
Matching raw edges of the lining, Clip or pin in place.
Pull back paper on each side of lining clip it out of the way. Stitch a ½” seam allowance.
Press paper back on lining.
The seam on the lining and panel should match. Press open linings seam allowance.
Clip or pin panel and lining together, to finish stitching the last 6” of the scallops. You may need to remove your sewing machines table and insert, leaving the machine with it’s open-arm feature.
Place the lined panel on the open arm and sew the last scallop closed. You can pencil mark over the opened seam to guide you to the scallop point.
Starting at the seam carefully remove the paper, top section first.
You can use a seam ripper to start tearing the paper under the seam. Set paper aside, you will use the pattern again on the batting filler in a later step.
Fray Check the fabric on this seam and above the lining and panels stitching.
Trim away excess fabric from scallops, leave ¼” from stitch line.
Notch the seam allowance every ⅜” to rid the seam of excess fabric, giving you a smoother top turned edge.
For your scallops to lay flat with no puckers on the bottom portion, you must release the tension in that area. On your cutting mat use an Exacto knife to get to that tight space. Using scissors can cause you to snip the thread line. Using an Exacto knife release the point tension with 2 miter cuts.
Turning the scallops
Pull the lining out exposing its right side.
Push the lining back into the bag.
Smooth the lining on the inside of the bag. Pull on it to match the raw edges of the bottom to the panels raw edge on the bottom.
While using the bone to push out the curve of the scallops roll the seam allowance with your fingers to help straighten and smooth until flat. Press with iron on the edge only.
I will now turn it back outside in.
Press scalloped pattern onto batting. Cut along scallop line. Add shaped batting to the border of the panel using spray adhesive to attach.
Turn bag inside out, adjust batting with fingers.
Baste batting down through all layers of the bag.
Turn the bag inside out to finish the bottom seams.
After turning the lining half way up the bag to get it out of the way, mark the bottom boxing cutouts on both the panel and lining as shown.
Cut out the same amount on other side of the bag.
Turn inside out, pull the lining down and cut away the excess corner fabric.
Turn the bag over and repeat on the other side.
Turn outside in to stitch the bottom seam and corners of the front panel -the outside of bag. Match bottom block seams. Clip or pin in place.
Sew bottom seam ½” from edge.
Fold corners, matching seam allowances. Stitch with ½” seam allowance.
With right sides together of lining, match raw edges, clip or pin in place.
Next stitch the linings bottom seam, leaving an 6” opening for turning.
Fold the corners….
Stitch the corners...
Turn inside out through the opening and adjust any batting if necessary.
Smooth out panel. Stitched close the linings bottom seam by hand or machine.
Push and smooth the lining into the bag.
Press border of bag, top-stitch if you like. Stitch in the ditch at applique block seams.
Stitch in the ditch on bottom panels.
Fold and press the corners and bottom boxing to give the finished bag soft edges.
https://swpea.com/products/new-life-easter-basket-4x4-5x5-6x6-in-the-hoop-machine-embroidery-design
Leave a comment
All comments are moderated before being published.
This site is protected by hCaptcha and the hCaptcha Privacy Policy and Terms of Service apply.