During my time at Sweet Pea, I have had a few opportunities to use the machines in our sewing room, whether it be in my own time or as part of my job, and while I always love it, I still consider myself a beginner. If I add up all the projects I’ve done, I can probably count them on my hands - and most would be single hoop projects - but in saying that, I do think I am an… experienced beginner thanks to all of them!
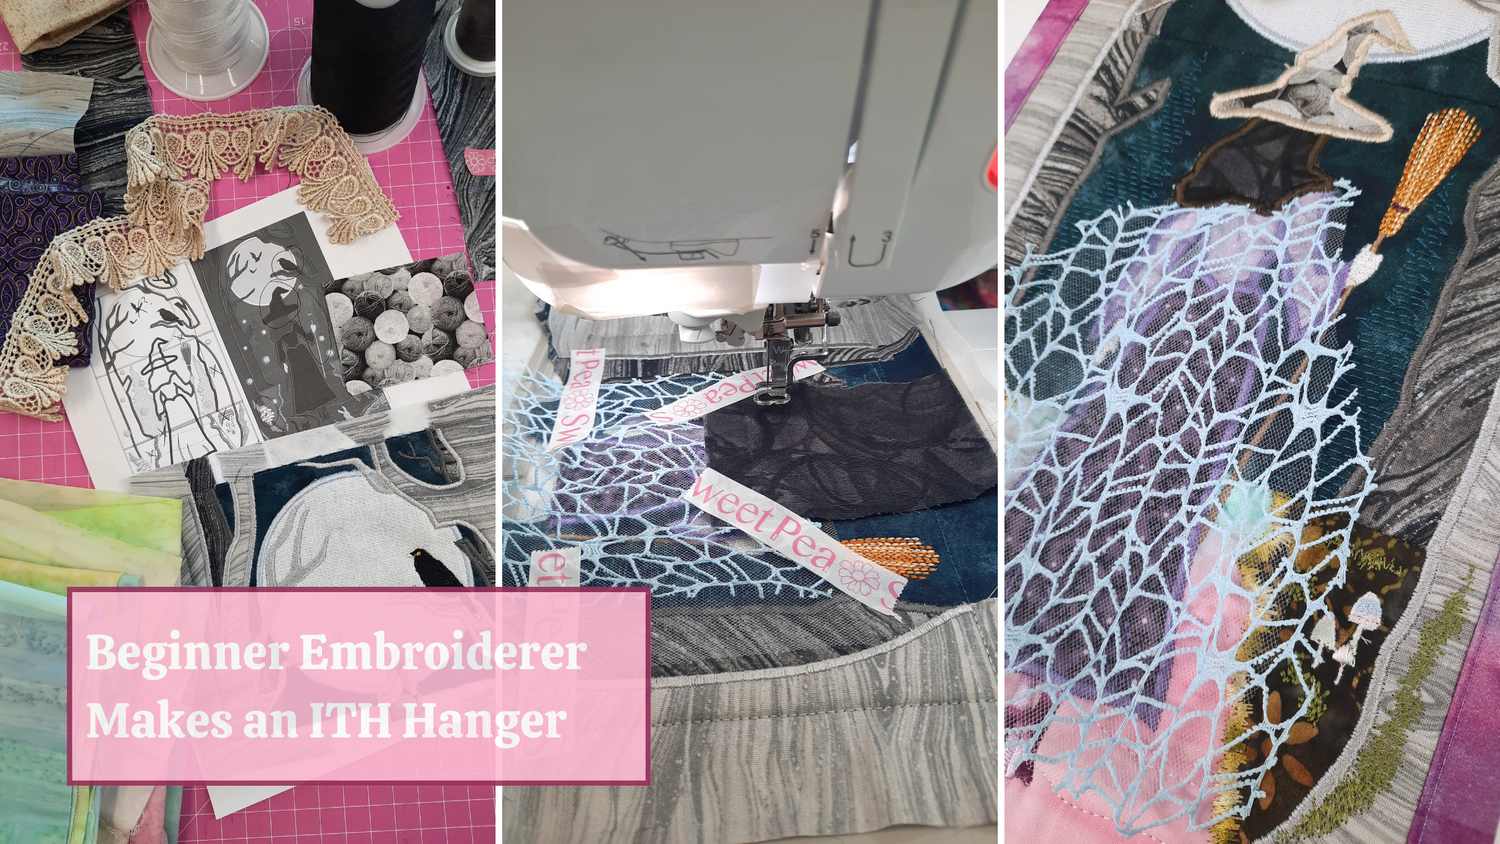
And so, I decided to challenge myself with my first hanger that would not become a UFO! Both a gift for a loved one and an opportunity to create some content, this particular project had too much counting on it. That project is the Walk of the Witch Hanger.
In this article, my goal is to share my struggles and my joys, give some inspiration to seasoned sewers, and a little confidence to those new to the machine embroidery world. So, let’s begin.
Starting at the start – picking and cutting fabric
I started by picking fabrics and cutting pieces that need to go together. I took a few photos of this process and while I did follow this pretty closely, there were a few changes here and there. I found it easier to have the photo of the sample printed out to help with this. When it came to thread, I mostly just matched to fabrics, but also knew I wanted to use some fun threads we had on hand, so I did this as I went mostly.
And here comes my first mistake – I did not math right at all! Tried to match up fabrics by cutting in big chunks and ended up with double the length I needed… shame on me!
Luckily, we have a great array of scrap bins, which I both pulled from and contributed to…
This was also the point where I chose what optional steps this hanger offers that I would and wouldn’t do – I decided yes to the bird, no to the bats and orbs, yes to the broom, no to the wand, yes to the cat, no to the rabbit (and I skipped a stone as well). There are so many ways you could create your witch, it’s crazy!

The first two panels
First panel problem solving; found a pretty iridescent fabric that was too thin on its own – Cassie helped me pick a fabric to match, we chose blue so I could use a grey blue for the satin stitch, which would bring in the iridescence that shifts from green to blue in my first fabric.
This panel was not too hard except for trimming. I trimmed too much in some places, and too little in others! Trimming is HARD. Why is 1mm so difficult for my brain to compute? I know this gets better with practice, but how much practice?!
Getting to the second panel things get a bit easier! Finally!
Originally, I had discussed the idea of adding some lace to the skirt with Cassie. I even had it all laid out, as you can see in my original fabric choices photos. Silvanna, who created the design, came back from a holiday about a third of the way through me making the design and suggested the idea of a cape or robe. I looked at our stash and found this really cool fabric that reminded me of spiderwebs, as well as a few nice shimmery transparent fabrics, and the rest is history!
If you want to do it yourself, I cut the shape of the pieces roughly, then added them when doing the stitch down for the hair fabric, repeating the step for each, trimmed as normal, then did the satin stitch to really hold it in place.
The hat is another thing I am particularly fond of. The person I made this for crochets and has made many beautiful gifts for my family. I had seen this yarn fabric one time while finding options with Cassie for something else and I knew when I started this piece, that would be the one.

Gaining confidence on the last ITH panel
Final panel and feeling confident… then I put the ombre fabric for the path not quite right! Wanting to show as many colour changes as possible, I ended up showing even less. And so, we unpick, we go again. Not the worst mistake.
I love variegated thread – it’s gotten to the point that half the office teases me about it – but I think it really has a place for certain things. One of my absolute favourite uses for it is on brooms. The way it stitches out really makes it look like the real deal! I also love how the mushrooms turned out. I used two different pastel variegations to create a magical mushroom effect.
I get into a rhythm on this panel, doing so well, and then the machine is EATING MY FABRIC? Turns out the stitches in some of the mossy areas are particularly thick and so I got a little helping hand to get through this. I know not everyone has sewers all around to call on but, if you get stuck, I recommend talking to people in our Facebook Group! And, if you can, making a friend to brainstorm with outside of this.
After this, I’m on a roll. A slow roll, but a roll nonetheless.

Getting back on the sewing machine
I had not used a regular sewing machine in over a decade, and the largest project I had made on one was a pillowcase when in high school! Cassie showed me the ropes and, thankfully, some of it came back to me. My mistakes were minor – stitching was not always straight, sometimes I stitched the wrong side up, some satin stitches didn’t quite line up and needed redoing – but overall, it looked good and I think I would notice it more than anyone else!
And that is how I made this hanger. I feel like I am surely missing little tidbits of information, but if you have questions, please feel free to ask me in the Facebook Group if you are there! I enjoyed making this and now feel confident to try something similar – my next challenge is going to be a Christmas runner for my mum! Until then – good luck, and happy stitching.

And that is how I made this hanger.
I feel like I am surely missing little tidbits of information, but if you have questions, please feel free to ask me in the Facebook Group if you are there! I enjoyed making this and now feel confident to try something similar – my next challenge is going to be a Christmas runner for my mum! Until then – good luck, and happy stitching.


1 comment
J Curtis
Thanks for sharing your pathway to making the hangar. We all need a little inspiration along the way so we don’t feel we are the only ones daring to make something new and out of the ordinary.
Leave a comment
All comments are moderated before being published.
This site is protected by hCaptcha and the hCaptcha Privacy Policy and Terms of Service apply.