For many years, I worked in commercial embroidery and the waste factor with stabiliser was exceptionally low. It was all about “unit cost” and the ability to keep manufacturing stateside instead of offshore. The stabiliser was bulk cut for the different hoop sizes and I still do most of this when prepping a project.
Using the inner hoop of the chosen frame as a size guide, measure and cut a further 2cm (¾”) out from each of the sides. Depending on what you are going to embroider, 2cm (3/4”) is more than enough to cut beyond all the edges of the inner hoop.
This amount of extra stabiliser gives enough excess to manipulate when hooped and to “perimeter pin”, to prevent stabiliser creep once in the machine.
NOTE: Leave more stabiliser if you have trouble with uncooperative hands.

Not only can we join stabiliser but we can also join batting/wadding (especially for “in the hoop” projects). You may need some washable glue (liquid or glue stick), some batting joiner (a fusible tape to join the batting by iron rather than stitching), and some double-sided hoop tape to use on the underside and the outer perimeter of the inner hoop.
Applying double-sided tape around the outside edge of the inner hoop prevents the stabiliser from moving or stretching, once hooped. The X-Pressit tape was originally for photography, papercraft and scrapbooking.

JOINING BATTING/WADDING
Quilters have always joined batting for their quilts. Naïve quilting started with the need to keep the stuffing (batting as we know it today), in place between two layers of fabric, from shifting around.
We have handy products like batting joiner: a fusible light woven tape, pre-cut and ready to apply with an iron.


Using the sewing machine to weld two straight cut edges together and hold them in place, with either a zigzag or triple zigzag stitches, is probably the most common method used and requires no extra expense.
Use the widest setting for these stitches but the length needs to be long enough to form right-angled corners on the points.
One of the most important parts of joining batting is that there is no visible line or step in thickness once the batting is in between the layers of fabric so high loft battings can only be joined with batting joiner. Of course, a matching thread is essential for this stitching but the use of invisible thread can be troublesome, so avoid it at all costs.

JOINING STABILISER:
If you are like us at Sweet Pea, we end up with many scrap lengths of varying widths. I have always been a bit mean with stabiliser and batting so I have always joined where possible. The only time I would not consider doing this is when using a light background, think white or cream, where a join line in either the stabiliser or batting may show through to the top side of the work.
Trim all the joining edges with a ruler to ensure they are perfectly straight. Some people pin the edges into place and then go to the machine a stitch the overlap with a long straight stitch. I prefer to use a washable craft glue first, to get the strips as flat as possible, and then machine a joining stitch through my glued seam. Any craft glue can be used; my cheaper preference is the Elmer’s Washable School Glue Stick I get from my local grocery store or office depot. This glue stick marks up in purple and then fades out when dry.


You can use an iron to make the joins dry and stick faster. Make sure the stabiliser is not one of the ones that will melt to the bottom of the iron. Using a pressing cloth or applique sheet can help the iron be more stabiliser tolerant.


The above photo is my ultimate goal, reclaimed batting and joined stabiliser. There will always be waste with embroidery but if you can reduce it by 40%, it is a great money saver.
Patching
For many years machine embroiderers have used a product called Filmoplast, a sticky back stabiliser that is a stronger tearaway type stabiliser with a paper-covered sticky membrane that allows the easy hooping knits and other difficult fabrics. The fabric was “floated”, in this case, stuck, in the hoop without the need for being caught up in the hooping process. This also reduced the risk of bruising or marking the fabric by creating “hoop burn”.
Once the embroidery is complete and removed from the hoop, it leaves a hole to patch with an off-cut of sticky stabiliser.

Apply the patch to the underside of the hoop and then pressed firmly into position from the right side: we are ready to go again in a very quick time.

The major downside of this whole process is the expense of the actual product, alas manufactured in Europe but they do manufacture it for other selected brand names. Albeit it an amazing product, it is overkill to use for “in the hoop”, so we tend to stick with quilt basting spray and Washi tape to create our products.
The following method is where we can save an incredible amount of money with just a little bit of extra effort and it takes no extra time. The method is best for cutaway stabiliser as tearaway will perforate too easily and have no strength or integrity to create and complete embroidery accurately.
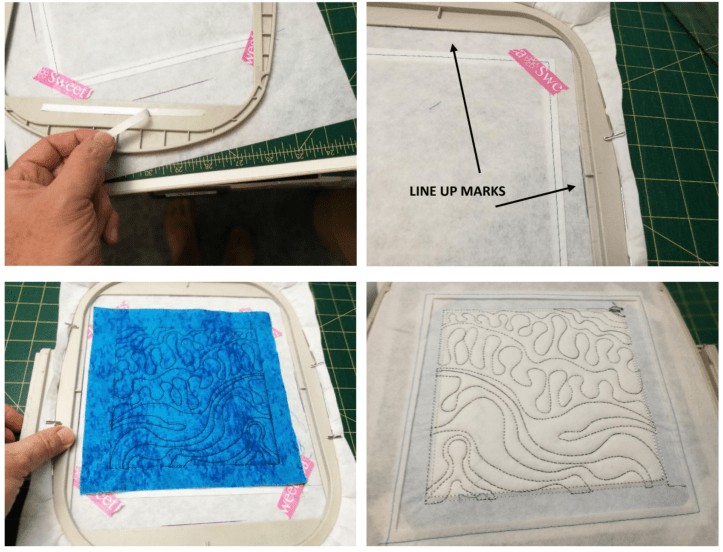
Before removing the completed work from the hoop, mark with a pen or marker, the centre of the four inner sides of the inside hoop.


The line drawn does not need to be more than 5 - 7.5cm (2-3”). These marks will help line up the stabiliser when it comes to re-hooping.
Remove the work from the hoop.

Using a rotary blade and ruler, trim the finished seam allowance from around the finished embroidered panel.
We are going to leave a window to patch with another scrap of stabiliser so try and keep the corner cuts as close to square as possible. There will always be an overshot cut from a rotary blade, no matter how careful we are. Using smaller 28mm rotary cutter gives more control in this areal than the 45mm can.

Measure the interior width and height of the inside hole where we have cut out the finished embroidery.
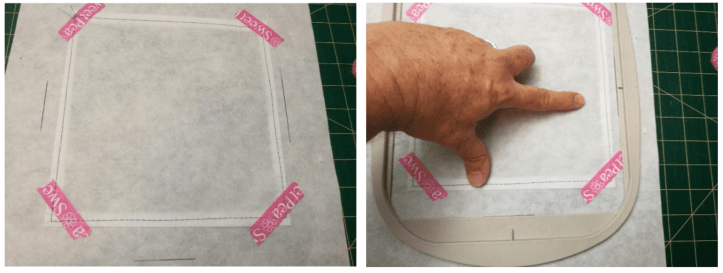
Cut a piece of scrap stabiliser using the measurements of the window just measured. Allow and extra 1.25cm (½”) on all sides to there will be an overlap to stitch around the hole.

NOTE: The grain of the scrap patch, if there is a noticeable one, should run in the same direction as the main stabiliser.
Once in position, tape across the corners with Washi tape to hold the layers together.

With a sewing machine and a straight stitch, stitch along the four sides of the patch using the longest sewing stitch. Refrain from back tacking so the stitching is easy to remove without wearing the base stabiliser.


Check that patch is sitting flat inside the window. Re-hoop by lining up the marks with the four sides of the hoop.

Place a strip of double-sided hoop tape at either end of the inner hoop (on the underside). The tape will assist keeping the stabiliser temporarily stuck to the underside of the hoop while lining up the marks we created earlier.
Return the hoop to the embroidery machine and complete another panel. The underside of the work will be within the perimeter of the patched window. Once completed, carefully remove the work from the hoop.

Unpick the basting stitching holding the patch onto the base stabiliser. Trim up the panel and repeat the process.

And that's all there is to it! I hope this article helps when trying to conserve stabiliser in your projects. And if you need more, we have a great range of stabiliser and batting!


1 comment
Lynette Rheynolds
Thank you Martyn. Great advice especially for newbies. Your hoop with the joined stabilisers and wadding certainly resembles lots of my hoops. I hate waste.
Leave a comment
All comments are moderated before being published.
This site is protected by hCaptcha and the hCaptcha Privacy Policy and Terms of Service apply.