When tackling a new machine embroidery project it is always important to have the right equipment and material on hand. For those of you who have done a little bit of research online, you will have seen a lot of advice leaning towards using test samples to zone in on the right stabiliser for your project.
However, the overwhelming number of stabilisers on the market, may make this an impractical starting point for those unwilling to kick their families out to make room for machine embroidery supplies. This isn’t to say you shouldn’t use test samples of material and stabilizer once you have a better idea of which kind to use. Using test samples is also a great way to find out if stabilisers work well together as sometimes using a single heavy duty product is less effective than using two lighter products.
Instructions on How to Use Double Side Tape
And Pin Your Stabilizer to Your Hoop
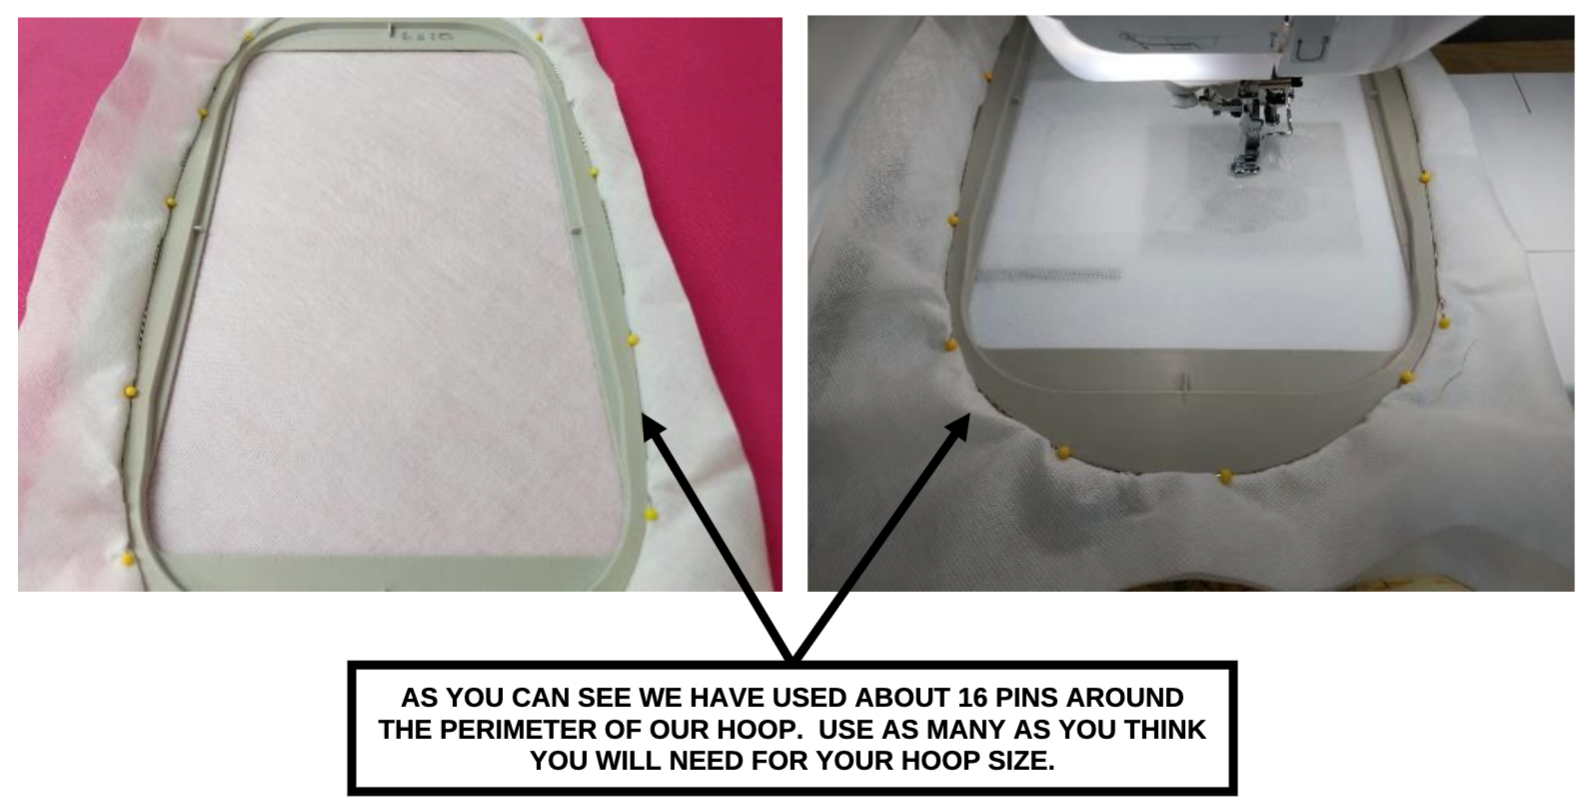
Before hooping stabiliser in your hoop, we HIGHLY recommend that you line the outside of your inner hoop with a double sided tape. The brand that we used is called X-PressIt and is about 6mm wide. You can get it in all different widths but this was the width that suited our hoop the best. This tape will stop the stabiliser from moving and puckering when your machine is embroidering.

Hoop up two layers of stabiliser in the hoop size you wish to use. This extra layer of stabiliser adds extra support. We also HIGHLY recommend pinning the stabiliser right around the perimeter of the hoop. Please take notice of how we have done this in the photos below. We are basically trying to keep the stabiliser as still as possible while the machine is embroidering.
Different Kinds of Stabiliser
There are essentially four kinds of stabiliser that that can be used for in-the-hoop and hooped machine embroidery designs. These are cut-away, tear-away, heat-away and wash-away. These are all best suited to certain kinds of designs or materials, and will usually have usage advice on the packet.
Cut-Away
Cut-away stabilisers are only partially removed once a machine embroidery design is complete. The excess stabiliser is as the name suggests, cut away, leaving a section over the design to aid in holding it together. This is a great stabiliser when the material being used is particularly loosely stitched or hand-knitted. It may also be a good idea to use this type of stabiliser for designs that may be subject to daily wear and tear like clothes or bibs. The big drawback for cut-away on some designs however is that the stabiliser may be visible and therefore not ideal for every situation. Another variety of cut-away stabiliser available is a soft mesh stabiliser. They are great where the stabiliser will remain but you want a soft finish. An example of this would be a quilt in the hoop design.
Tear-Away
For machine embroidery designs where it is undesirable or impractical to have any residual stabiliser on the finished item, a tear-away will be preferable over cut-away. Once a design is finished, these are carefully torn from around the stitches. It is very important to test this style of stabiliser before use, as certain brands and heavier duty products don’t tear as easily as others or tear while in the hoop. The last thing you want to do is create a beautiful design only to have stitches come loose when removing the stabiliser. It may also be a good rule of thumb to use multiple lighter gauge sheets than one heavier gauge as they will be easier to tear and can be removed individually. We use tear- away stabiliser in most of our zipper purse in the hoop designs as the stabiliser needs to be removed from the zipper opening.
Wash-Away (soluble)
Finally we have wash-away stabilisers, which can be used effectively for a wide range of machine embroidery designs and are perfect for delicate and mesh fabrics. There are a number of wash-away stabilisers that come in the form of a spray that can be applied to a material and hardens like a resin. These can be great for uneven materials that would leave gaps with a sheet style stabiliser. They can also be some of the most versatile stabilisers on the market. The big drawback for wash-away with certain projects is of course their method of removal makes them completely impractical for any design that will need continued support post-wash. We use this type of stabiliser for all our ornament type in the hoop designs. It is preferable to use over tear-away in this situation as tear-away can leave a fine edge of stabiliser remaining which may be seen on the completed project.

9 comments
Marlene Habitz
What about batalizer
Ilona Hagen
Danke für die hilfreichen Tipps.
Ann Miller
I believe your video and instructions were made pre-magnetic hoop craze. I planned on using mine and I just have to say I think most underestimate the value of reading ALL of your guides!! Speaking for myself, I just learned I was using the wrong suggested stabilizer (tear-away) and not 2 layers. Also, should I pin with magnetic hoop? I assume not but really am not sure.
Jenny Soerensen
Good reminder for hooping successfully and the correct stabilizer to use. I tend to use wash away mesh most of the time.
Great information . Thanks
Daisy
Just starting Cassie the Crazy Crafter – have reviewed each page and the directions appear to be clear in your photos. Love her sweet look! A bot daunting at this point but will be so much fun picking out all the colors to use. Thank you.
Leave a comment
All comments are moderated before being published.
This site is protected by hCaptcha and the hCaptcha Privacy Policy and Terms of Service apply.